The Web component
The web component allows you to display web content or a web page in your application via a webview/iframe. Beyond a simple display, it is also possible to trigger events and create actions related to user actions on the web content (when he clicks on a button etc...).
Concretely the web component allows you to create an application or enrich it from a content already available on your website. As soon as you update this content on your website, it is automatically updated in the application. However, an Internet connection is required to display this content.

In this article
Display a web page
The web component allows you to embed an iframe/webview within your application. The content is displayed directly within your page, the user does not need to exit the application (unlike the Open URL which automatically opens a web browser).
For example, you can insert a page from your website (for example a list of articles or an authentication form).
To display a web content, click on Components and choose the Web component.
In the window Properties, click on Online and type the URL. The site must be secure and the URL must start with https. Beware however some sites block iframe access. If the content of the web page is not displayed, it is possible that this site blocks access.

Create a mobile view of your web page
When inserting a web page or content into a mobile app, it's often necessary to remove navigational elements from your website so as not to disrupt navigation within the app. If you have a Wordpress or other CMS site, you just need to duplicate the page and remove the header and footer. Publish this mobile view and use this specific URL in your web component.
Interact with web content
Beyond simply displaying a page or web content, the web component allows you to interact with that content using the PandaBridge JavaScript library. For example, if your login form is displayed from a website, it is interesting to know if the user has logged in to automatically redirect them to your application screen.
To send or receive events between web content and your application, you need to create markers.
Creating a marker
A marker allows you to trigger an event or take an action, to personalize your user journey. You can create as many markers as you want.
Select your web component and click the button. Edit button. In the Edit window on the left, click + Add Marker. An ID is automatically generated: make a note of this ID to reuse it on your website side and make the right connection.
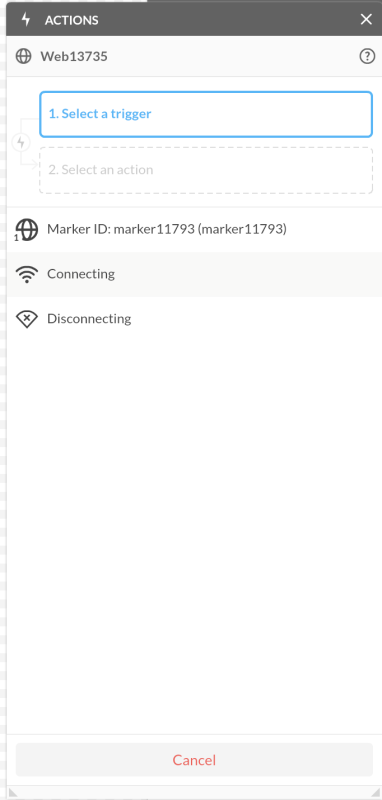
In PandaSuite Studio, this marker is available as a trigger in the window Actions of the web component. You can also interact on this marker from the Interact on a component:

Trigger this marker from a web page
Go to the administration level of your web page, from your CMS (Wordpress, Shopify...) or code.
You have several options to call the PandaBridge library and trigger the marker:
By inserting the Javascript library
Insert the following code in your web page to call the library:
<script src="https://cdn.jsdelivr.net/npm/pandasuite-bridge@4.2.3/lib/pandasuite-bridge.min.js"></script>
Use the following syntax to send the marker:
PandaBridge.send('marker8622')
You can also pass parameters to then use in your actions (for example):
PandaBridge.send('marker8622', [{ url: "https://pandasuite.com" }]);
Or by using a URL
If you don't have access to the web page code, you can also use the following URL to automatically trigger the marker. You can associate this URL with a button or else a redirect action.
https://pandasuite.com/bridge/send?name=marker8622
Associate an action with a web marker
Once the marker has been configured from your web page and application, all that's left is to create the action.
Select your component Web and click on Actions. Choose your marker as a trigger and the action of your choice, for example: Go to next screen.

Receiving a marker in a web page
It is also possible to receive a marker defined in PandaSuite Studio.
For example, if you want to create a native navigation from the app and redirect on click to different web content.
Use the following function:
PandaBridge.setSnapshotData(function (pandaData) {
  // pandaData.data.id
});
Insert a ZIP file
Within the web component, you can also insert a ZIP file. This is the way to insert in your application your own code, an animation or any web export from another tool (Powerpoint,...).
In the window Properties, choose Offline (local) and insert your zip file.
Preparing the ZIP file
To be readable, your files must be located at the root of your file so that they are directly accessible upon extraction. Do not group your files in a folder before compressing them into .ZIP (see example below).

If you want to go further and create a communication between the ZIP file (send & receive information), please refer to the article on the custom component.
Hint: since this content is online, your user must be connected to the Internet to view it. Using the Connected (online) / Disconnected (offline) triggers, you can send a notification to offline users.
